The Samsung Galaxy A9 sports a 13-megapixel rear camera with PDAF (phase detection autofocus), an f/2.0 aperture and dual-tone LED flash .The 8-megapixel front camera sports an 84-degree wide angle lens.It has a Snapdragon 652 processor which is a good processor.It comes with 4000 mAh battery capacity which can last for two days with mixed usage.
Many users like to root their device but they end up by bricking their device.This happens because they donot have enough knowledge of rooting and sometimes the rooting process of the custom rom is not secure enough.So,in this article Gammerson will tell you how to Unbrick your Samsung galaxy A9.

Disclaimer:
Gammerson.com is not responsible for any damage happened to your device(s) while following this guide, Proceed at your own risk.
Requirements:
- A PC or Laptop
- Make sure your phone’s battery is charged at least 50%
- Enable USB Debugging– Go to your settings> about phone> find Build number and tap it 4-7 times until its show you a message “Now You’ve a Developer Option”. Now go to your settings> developer options> Check on USB Debugging. (If your phone is not bricked, otherwise leave this option)
- Make a full Backup of all your apps and important data, because flashing ROM can erase everything from your Phone’s memory. Download Odin Flashing Tool From Here – Odin 3.09 (this is a zip file, first extract it to use)
- Download USB Driver for Samsung Galaxy A9 – USB driver (this is a zip file, first extract it to use)
- Download Stock ROM for your Samsung Galaxy A9, check your model and download Stock ROM from here I’ve listed below:
Samsung Galaxy A9 Stock Firmware/ROM For SM-A9000- – Download (5.1.1 Lollipop)
Samsung Galaxy A9 Stock Firmware/ROM For SM-A9100- Download (6.0.1 Marshmallow)
How to Unbrick Samsung Galaxy A9
- After installing USB Drivers in your PC or Laptop, Reboot your Samsung Galaxy A9 into Download mode by pressing Home button + Power Button + Volume Down key at a same time for 3-4 seconds until its goes to Download mode, and select continue for flashing process:
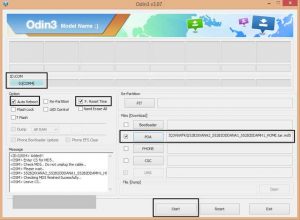
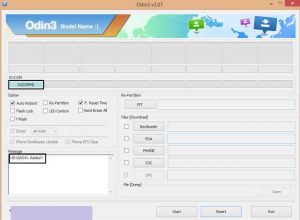
- Now Open Odin.****.exe and after reboot your Samsung Galaxy A9 into download mode connect it with your PC with help of a data cable,after connecting Odin will indicate you a message “Added” and ID: COM port on Odin will turn Blue or Yellow depending on Odin’s version, that also means Odin tool is ready for flashing firmware

- Now Click on AP or PDA for selecting your firmware that is in .tar or .tar.md5 extension, simply select it and now click on start option on Odin, and leave all settings remain, you have to check only “Auto Reboot” and “F. Reset Time” and leave all settings unchecked, after clicking on start button your flashing process will be start and it takes 5-7 minutes, and when its completed, it will indicate a message PASS on Odin, your device will be automatically Reboot and restart in few minutes, keep patience and do not unplug before its complete

- In case, If you got a multi firmware like AP, BL, CP, CSC and .PIT files, then while flashing select all your components one by one and also .PIT file if you have to flash a multi firmware , Check only Re-Partition and F. Reset Time and leave all settings unchecked, now click on start and until your flashing completed.
- Fixing Boot loop Problem In Samsung Galaxy A9, After Flashing Firmware
- In some cases, your Samsung Galaxy A9 might stuck in Boot loop problem, to solve this simply reboot your Samsung Galaxy A9 into recovery mode by pressing Power + Home + Volume UP and do a wipe data/factory reset, and reboot your device.
It will start properly and all problems are now solved! congratulations! you’ve successfully unbrick Stock ROM in your Samsung Galaxy A9.
If still any queries left in your mind ,feel free to ask us in the comment section